HOME ~ ABOUT ~ PATTERNS ~ WORKSHOPS ~ ORDERING ~ OOPS! ~ BLOG ~ CONTACT
Oops!
|
Despite
our best efforts to provide total accuracy in our patterns,
occasionally something slips by the
|
|||
|
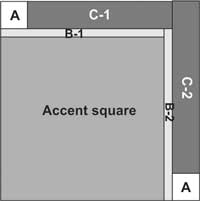
SQUARE DEAL Page 2, Figure 6: Rotate unit A/C-2 as shown below:
FOLLOW THE LEADER Make the following changes to page 1 in the pattern: (Corrections are shown in bold.) CUTTING: The panel squares cannot be cut the size indicated in the pattern and are not printed square. Fabric A: 1. Change 10¼” to 9¾”. Fabric E: 1. Change 1⅝” to 1⅞” and change 10¼” to 9¾”. PIECING:
A.
The Animal Block: CHANGES FOR PILLOW: Cut Fabric A squares 9¾” and the (4) border strips 2⅞”.
WOODLAND STAR
SHADOWPLAY (cover quilt: Northcott Cool Skins)
Page 2: PIECING THE BLOCKS and FLYING GEESE UNITS
Page 8:
SHADOWPLAY (cover quilt: Earth Tones) Change all Queen size references to Double/Queen. The size should be listed as 80” x 96”. Pattern cover: Fabric A (Double/Queen). . . . . .5 yards Fabric F (Lap). . . . . . . . . . . . . .⅔ yard (Double/Queen). . . . . . . .⅞ yard Backing (Lap). . . . . . . . . . . . .4⅞ yards (Double/Queen). . . . . ..8⅞ yards Batting (Double/Queen). . . . . 90” x 106” (Crib). . . . . .45” x 57” Pattern: Page 1, Cutting: Fabric A: fifth bullet. . . . change 11 to 10 sixth bullet. . . .change 10 to 9 Fabric B: first bullet. . . . .change 3 to 2 Page 4, Finishing: 1. Change to read: “Prepare backing with vertical seams to measure (69” x 85”, 90” x 106”). Press seams open.” Page 9, Finishing: 1. Change 45” x 55” to 45” x 57”. The “NOTE” refers to the Crib backing.
CUTTING CORRECTION: Fabric C: Cut four 3 1/2" strips for blocks (this error is not in every pattern) Arrows are missing in Figures 7 and 8
to denote pressing directions.
TWILIGHT
TWILIGHT
PATTERN COVER:
Fabric A. . . . 3/4 yard
CUTTING: Fabric A
(21022-49):
1. Trim to measure 22½” x 40½”, centering design as desired.
a. 1st tracing row: For this row only, measure 2¼” from Trace 13 dark triangles along the length of fabric. Make changes to the "1st tracing row" as shown in the diagram below: 
VANTAGE POINT On Page 1, change the wording for the TIP under CUTTING to read:
[TIP:
The black and grey half rectangles can be cut from a double
layer of fabric if the fabrics
are
solids or do not have a right and wrong side. If the fabric
does have a right and wrong side,
cut the half rectangles from a single layer placed right
side up with the template for the
X
[TIP: The black and grey half rectangles can be cut from a double layer of fabric if the fabrics are solids or do not have a right and wrong side. If the fabric does have a right and wrong side, cut the half rectangles from a single layer placed right side up with the template for the X half rectangles in this position:
and the template for the Y half rectangles in this position :
|
|||